


The glissando is a fundamental technique frequently found in piano music, offering a distinctive and expressive element that adds depth to compositions. This article provides an in-depth look at the glissando, discussing its history, significance, and application in both classical and modern piano pieces. Aimed at pianists of all skill levels, the guide will cover the technical aspects of performing glissandos on the piano, along with examples from notable works.
What is a glissando?
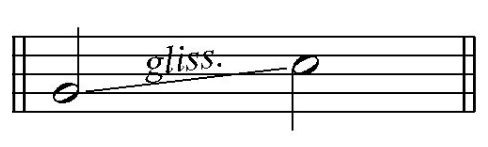
A glissando, often encountered in piano music, is a technique where a series of notes are played rapidly in sequence, creating a sweeping sound that glides from one pitch to another. This technique, pivotal in enhancing the expressive quality of a piece, has been a part of the pianist’s repertoire since the instrument’s inception. In musical notation, glissando is often abbreviated as gliss.
Historical background and evolution
The glissando has a rich historical background, tracing back to the early days of piano music. Its evolution is marked by its use in classical compositions as well as in contemporary music. Initially, glissandos were employed sparingly, mainly for dramatic effect. Over time, composers like Franz Liszt and Frederic Chopin began to use them more liberally, exploring their potential to convey a range of emotions and textures.
Glissando in classical and contemporary music
In classical music, glissandos add a sense of grandeur and fluidity, often used to transition between musical phrases or to highlight climactic moments. In contemporary music, the technique is adapted in various styles, including jazz and pop, showcasing its versatility.
In musical notation, a glissando will be notated something like this:

Or, like this:
Types of glissandos
Glissandos on the piano are not a one-size-fits-all technique; they vary significantly in their execution and effect. Understanding these variations is crucial for the best pianists today who wish to utilize this technique effectively in their repertoire.
Ascending and descending glissandos
The most basic classification of glissandos is into ascending and descending types. Ascending glissandos start at a lower note and glide upwards while descending glissandos do the opposite. The direction of the glissando can significantly affect the mood and intensity of a musical piece.
Black key and white key glissandos
Another important distinction is between black key and white key glissandos. Black key glissandos, involving only the piano’s black keys, have a distinctive sound and are often easier to execute due to the raised position of the black keys. White key glissandos, on the other hand, require a bit more finesse and control, as they involve the flat surface of the white keys.
Techniques for executing perfect glissandos
Mastering the glissando on the piano requires both understanding and practice. Here, we provide detailed guidance on how to execute glissandos flawlessly, whether you’re gliding music notes high to low or vice versa.
From high to low notes and vice versa
The direction of your glissando matters. When performing a descending glissando (high to low), you’ll typically use the back of your fingers or the nail of your thumb, gliding down the keys in a swift, controlled motion. For ascending glissandos (low to high), the back of the fingers or the nail of the little finger is commonly used. The key is to maintain a relaxed hand while ensuring a smooth, even pace across the keys.
Achieving a smooth and fluid glissando
Smoothness in a glissando is achieved by maintaining consistent pressure and speed as you move across the keys. It’s essential to practice this movement to avoid a disjointed or stuttered effect. Experiment with different angles and pressures to find what works best for you.
Special considerations for black keys
Performing a glissando on black keys requires a slightly different technique due to their raised and narrower profile. It’s often easier to execute a black key glissando, as the elevation provides a natural guide for your hand. However, precision is still key to ensure clarity and control over the sound.
When and how to use glissandos?
Integrating glissandos into your piano playing is not just about technical ability; it’s about understanding the right musical context and the emotional impact of this technique. This section offers insights into when and how to use glissandos effectively in your performances.
Identifying the right musical context
Glissandos are not suitable for every piece or moment in a composition. They work best in passages that require emphasis, dramatic transitions, or a flourish of excitement. In slower, more reflective pieces, a glissando might disrupt the mood. It’s crucial to be discerning and use this technique where it enhances, rather than detracts from, the overall musical narrative.
Choosing the right moments for glissandos
The decision to incorporate a glissando should be based on both the composition’s demands and your artistic interpretation. In some pieces, the score explicitly indicates a glissando. In others, you have the freedom to add them as you see fit. Consider the emotional tone and structural flow of the piece when deciding where a glissando would be most effective.
Practice methods for preparing glissandos
Effective practice is key to mastering glissandos in various musical contexts. Start by practicing glissandos in isolation, then gradually incorporate them into larger sections of music. Pay attention to the transition into and out of the glissando, ensuring it feels natural and fluid within the piece. Recording your practice sessions can be helpful in critiquing your timing and execution.
Famous piano pieces featuring glissandos
The use of glissandos in piano music has not only defined certain pieces but also showcased the expressive range of the piano. Here are some notable examples:
- George Gershwin’s “Rhapsody in Blue”: This iconic piece begins with a bold, attention-grabbing glissando that sets the stage for a fusion of classical and jazz elements. The glissando here is not just a musical technique but a statement of style and era.
- Claude Debussy’s “Clair de Lune”: In contrast to Gershwin, Debussy uses the glissando in a much more subtle manner. In “Clair de Lune,” the glissandos are delicate, creating an ethereal quality that enhances the piece’s dreamlike atmosphere.
- Frédéric Chopin’s “Grande Polonaise Brillante”: This piece demonstrates Chopin’s masterful use of the glissando to add a flourish to his compositions. The glissandos in “Grande Polonaise Brillante” are both technically challenging and artistically expressive, showcasing Chopin’s skill in integrating the technique seamlessly into his work.
- Ludwig van Beethoven’s “Moonlight Sonata” (3rd Movement): Although more known for its melodic first movement, the final movement of “Moonlight Sonata” features rapid glissandos that contribute to the intensity and emotional depth of the piece.
- Sergei Rachmaninoff’s “Piano Concerto No. 3”: This concerto is renowned for its technical demands on the pianist, including the use of glissandos that require precision and agility. Rachmaninoff’s use of glissandos adds to the dramatic and expressive nature of the concerto.
This YouTube video demystifies the clarinet glissando, where the player slides between notes without breaking. Demonstrating two methods—finger sliding and embouchure adjustment—it provides a clear, practical guide to mastering this technique. The highlight is a rendition of the famous glissando from George Gershwin’s “Rhapsody in Blue,” illustrating the technique’s beauty and complexity. This concise tutorial is perfect for clarinetists eager to enhance their skills.
Additional tricks and advanced glissando techniques
Once you’ve mastered the basics of glissandos, you can explore additional tricks and advanced techniques to further refine your skills. These advanced methods not only enhance your technical proficiency but also expand your expressive capabilities on the piano.
Incorporating dynamics and expression into glissandos
A key aspect of advanced glissandos is the ability to control dynamics and expression. This involves varying the speed and pressure to create different volumes and emotional effects. For instance, a swift, light glissando can convey a sense of playfulness, while a slower, more forceful one can evoke drama and intensity.
Advanced practice routines
Developing advanced glissando techniques requires targeted practice routines. Focus on exercises that challenge your speed, control, and precision. Experiment with glissandos over different intervals and in various musical contexts. It’s also beneficial to practice glissandos with both hands, as this increases your versatility as a pianist.
Exploration of advanced glissando techniques
For experienced players, exploring unconventional glissandos can be rewarding. This includes techniques like the ‘ripple glissando,’ where you rapidly alternate fingers to create a rippling sound effect, or integrating glissandos into complex chord progressions. These advanced techniques demand a deep understanding of the piano and a high level of finger dexterity.
By embracing these advanced techniques and tricks, you can make your piano playing more dynamic and captivating. Advanced glissandos offer a way to push your boundaries and express your musicality in new and exciting ways.
How to do glissando without hand injuries
While mastering the glissando is an exciting aspect of piano playing, it’s crucial to approach this technique with an awareness of safety and comfort to prevent hand injuries. This section focuses on proper hand positioning, motion, and strategies for safe practice.
Proper hand positioning and motion
Correct hand positioning is vital when performing glissandos. Avoid tensing your fingers or hand; instead, keep your hand relaxed but controlled. Your fingers should be slightly curved, using the tips or nails for smoother motion. When executing the glissando, the movement should come from your arm and wrist, not just your fingers, allowing a fluid, sweeping motion across the keyboard.
Strategies for practicing glissandos safely
To practice glissandos safely, start slowly and gradually increase your speed as you become more comfortable. It’s important not to force speed or pressure, as this can lead to strain. Regular breaks during practice sessions are essential to prevent fatigue and overuse injuries.
Building finger strength and flexibility
Regular exercises to strengthen your fingers and increase flexibility can be beneficial. Simple drills, such as playing scales or arpeggios, can help build the necessary endurance and control for performing glissandos. Remember, the key to safety is consistency in practice and mindfulness of your technique.
Preserving your piano while performing glissandos
Performing glissandos, especially frequently or with great intensity, can have an impact on your piano’s condition. It’s important to be aware of this and take steps to preserve the instrument. This section offers advice on maintaining your piano when incorporating glissandos into your playing.
Impact of glissandos on piano keys
Glissandos involve a sweeping motion across the piano keys, which can lead to wear over time, especially on the key surfaces. Pianists should be mindful of the pressure used during glissandos to minimize this wear. Using a lighter touch can be effective in reducing the impact on the keys while still achieving the desired musical effect.
Regular maintenance for pianos used for glissandos
Pianos that are frequently used for playing glissandos may require more frequent maintenance. This includes regular tuning and, if necessary, key repair or replacement. It’s advisable to have a professional piano technician inspect your instrument periodically to ensure that any wear from glissandos or other playing techniques is addressed.
Integrating glissandos in piano mastery
For pianists, the process of learning and mastering the glissando is both challenging and rewarding. It requires not only technical skill but also an understanding of musicality and expression. By practicing and applying the insights provided in this guide, pianists can enhance their repertoire with this dynamic and expressive technique.
Remember, the ultimate goal of integrating glissandos into your playing is to enrich your musical narratives and connect more deeply with your audience. Whether you’re performing a classical masterpiece or a contemporary composition, the glissando can elevate your music, adding a layer of complexity and emotion.
Author of this blog post:
Susana Pérez Posada

With over seven years in piano education and a deep passion for music therapy, Susana brings a unique blend of expertise to Skoove. A graduate in Music Therapy from SRH Hochschule Heidelberg and an experienced classical pianist from Universidad EAFIT, she infuses her teaching with a holistic approach that transcends traditional piano lessons. In her writings for Skoove, Susana combines her rich musical knowledge with engaging storytelling, enriching the learning experience for pianists of all levels. Away from the piano, she loves exploring new places and immersing herself in a good book, believing these diverse experiences enhance her creative teaching style.
Edited and fact checked by Eddie Bond, multi-instrumentalist performer, composer, and music instructor
Published by Lidya Hovan from the Skoove team