


Picture this: You finally have a quiet moment to sit down and practice piano. Your fingers are hovering over the keys, ready to play that piece you’ve been practicing for months. But suddenly, your hands feel awkward, your fingers struggle to find their place, and the melody just doesn’t sound the way you imagined.
Sound familiar? For many adult beginners, these moments of frustration are common and often trace back to one thing—neglecting the basics. Skipping essential hand and finger exercises might seem harmless, but it can slow your progress and lead to habits that are hard to unlearn.
In this guide we will dive into essential exercises specifically designed for adult beginners. These drills are simple yet powerful tools to strengthen your fingers, increase dexterity, and improve coordination, helping you gain control and confidence at the piano.
Piano hand and finger exercises for beginners
Piano fingering exercises are an incredible way to learn about how to use your fingers when playing the instrument. Many will start on middle C, some will focus on scalar passages or contrary motion (working in opposite directions), some will focus on chords – just follow the general guidelines of which fingers to use. There are so many things to practice. Practicing finger exercises is one of the key building blocks for you as a beginner. Practice slowly, and focus on the change of hand position. Warm-up exercises for piano are very important to learning to play well.
Incorporating these exercises into your routine will bring great benefits, such as increasing finger strength, flexibility, dexterity, and control. Better still, you get to keep these skills forever!
Exercise #1: finger drills
Theodor Leschetizky, a 19th-century pianist and professor, popularized the notion that it is easier to memorize music with sheet music on your lap than in front of the piano.
Like Leschetizky, we also recommend practicing away from the piano from time to time. You can do this by going through any sheet music, doing finger drills, tapping rhythms, and so on as often as you can. This is one of the “away from the piano” exercises mentioned earlier.
How to do the exercise:
You can do this exercise on any flat surface – a dining room table, a subway train’s window, your office desk, literally ANYWHERE! It will also help you improve finger independence, finger-strength, and coordination.
- To start, place your fingers on a flat surface, as though you are placing them on a piano. Next, “play” each different finger, paying attention to the motion of your fingers. Start with your thumb (finger number 1) and lift it up, and put it down. Now, play your index finger (finger number 2), and keep going until all five fingers have played. Keep all the other fingers stationary and make sure that you don’t lift any other finger except the one that is playing.
- Once you have done this a couple of times, try mixing it up by playing sequences of numbers. You can use just about any sequence – such as 15324, 14253, and so on.
- Lastly, you can play with both hands at the same time, using the same finger on each hand. Try playing sequences together, with both thumbs being finger number 1.
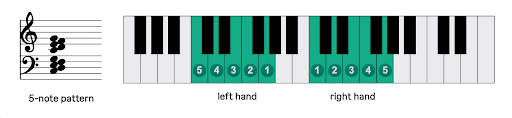
Exercise #2: A 5-note scale
This exercise is what we call a pentatonic scale and has you playing the first 5 notes of a scale with independent fingers. Being able to play notes in a controlled motion is vital if you want to be a well-rounded pianist, so we recommend incorporating this particular exercise into your warm-up routine. Later on, you can further extend it with other scales and arpeggios.
How to do the exercise:
- Start by placing your right thumb on Middle C. Then place your index finger on D, middle finger on E, ring finger on F, and little finger on G. Make sure you have the right-hand position, with your fingers slightly curled and your palm higher than the keyboard of the piano.
- Now play each note, paying close attention to what sound you are producing. You want to create a uniform sound (playing each note at the same volume as the previous one). Try to also maintain a steady tempo. Play all 5 notes ascending – CDEFG, and all 5 notes descending – GFEDC a few times. Once you feel confident to do so, speed the tempo up dramatically, and slow it back down.
- Now, repeat this process for the left hand. Start by placing your little finger (finger 5) on a lower C, and repeat the same process.
- Lastly, try coordinating your hands by playing the same 5 notes in both hands – first ascending, then descending.
If this sounds too complicated, don’t worry! You can learn more about piano scales here. Once you’re ready to put this into practice, try playing the pentatonic minor scale through this Skoove app lesson:
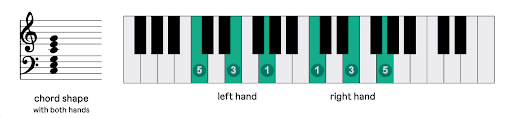
Exercise #3: playing chords
This exercise will help you with hand placement and force you to use more than one finger at a time. Don’t fret if you find the coordination hard initially. You should be able to condition your muscles into naturally placing a chord quite easily once you’ve done it a few times.
How to do the exercise:
- We’ll start with the right hand. Place your fingers following a similar pattern as shown in the image above — in other words, pressing three keys, leaving one key in between each. You should play these three notes at the same time. Try pressing all three notes simultaneously a few times.
- Now move your hand around, trying to play a chord on whichever note your hand lands.
- Once you’ve mastered playing piano chords with your right hand, try doing the same exercise with your left hand.
Exercise #4: playing legato and staccato notes
In music, composers often instruct performers to play legato or staccato notes. Legato notes are smooth, even notes that usually create flowing phrases in music. Staccato notes are loose, separated, short notes. Practicing these will help you add expressivity to your playing and give you more control over the tone-color of the music you play.
Before we continue, it is important to note that there are two types of staccato notes. The first type is a wrist staccato, which you play by moving only the wrist. The second type is a finger staccato, which relies solely on the speed of your finger to play the short, sharp staccato note. It is often left to the performer’s interpretation to choose which one to do. For this exercise, we’ll be practicing a finger staccato movement.
How to do the exercise:
- Place all 5 fingers of your right hand on the piano, and start playing a 5-note scale. Hold each note down until you play the next – connecting them and playing them smoothly. Make sure that there are no silences as you ascend and descend on different notes.
- Next, try doing the opposite by playing the same notes with a short finger staccato. Imagine that the notes are as hot and that your fingers burn as you touch them – this should give you the right technique. Make sure that your hand doesn’t move off the keyboard. Simply do light touches with your fingers as they make contact with each key.
- Try doing this exercise with both hands playing simultaneously.
Exercise #5: piano hand coordination
This may seem like an obvious suggestion to make, but starting with an easy song is really important in giving you a good start to building coordination between the hands.

The first example to look at is Mozart’s Sonata No 11, taken from our Beginner Course 1. Looking at the music, we can see that the right hand and left hand parts are exactly the same, the only difference being that they are one apart. Both hands have the same rhythm, and move in the same direction… Easy right?
How to do the exercise:
- Play the first four bars using the right hand only. Once you are comfortable doing this, play with both hands together. But when you do, and this is really important, think of the right hand leading the left hand. Were you able to play it for the first time? If not, then give it a few more tries, and if you’re still struggling, then carry on reading, as the next tip will help you out a lot!
- Once you have played this example successfully, make sure you go through and complete the other hands together songs in the Beginner Course 1.
Three practical songs for finger exercises
When it comes to improving finger strength and dexterity, learning to play certain songs can be a fun and effective approach. These pieces not only focus on finger independence but also challenge your coordination and speed. Whether you’re just starting out or looking to refine your technique, the following songs provide an excellent balance of rhythm, melody, and finger movement.
Song #1: You Are the Sunshine of My Life
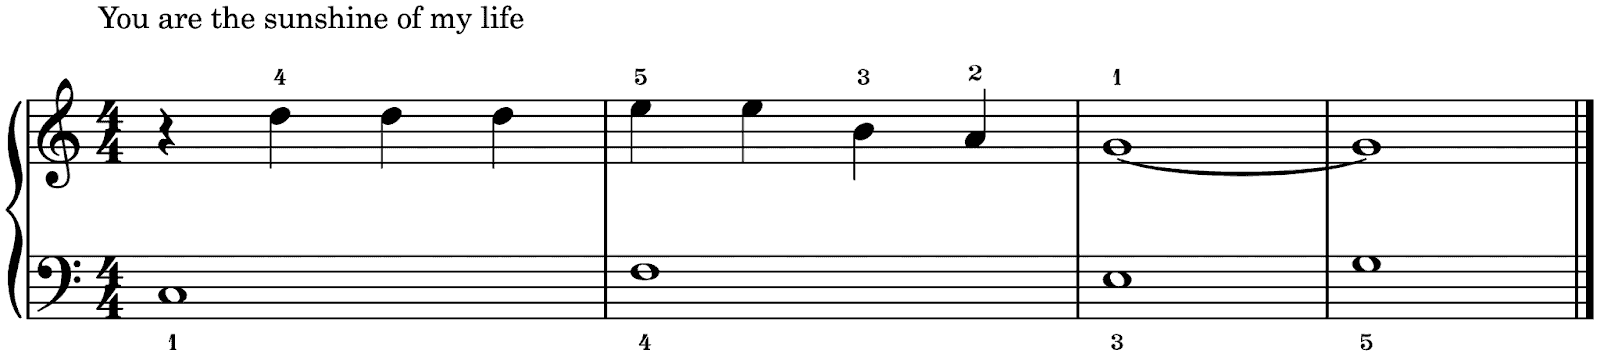
Here are the first four bars from “You Are the Sunshine of My Life”. The first step when assigning fingers to keys is to look for the highest and lowest notes within the melody. Pay attention to the melody in music. Get into a five finger position and place our thumb on G and our fifth finger on D, and our three middle fingers on piano, the piano notes in between. All the keys we need are at our fingertips. If you’re having trouble, you can always label the piano keys.
Song #2: House of the Rising Sun
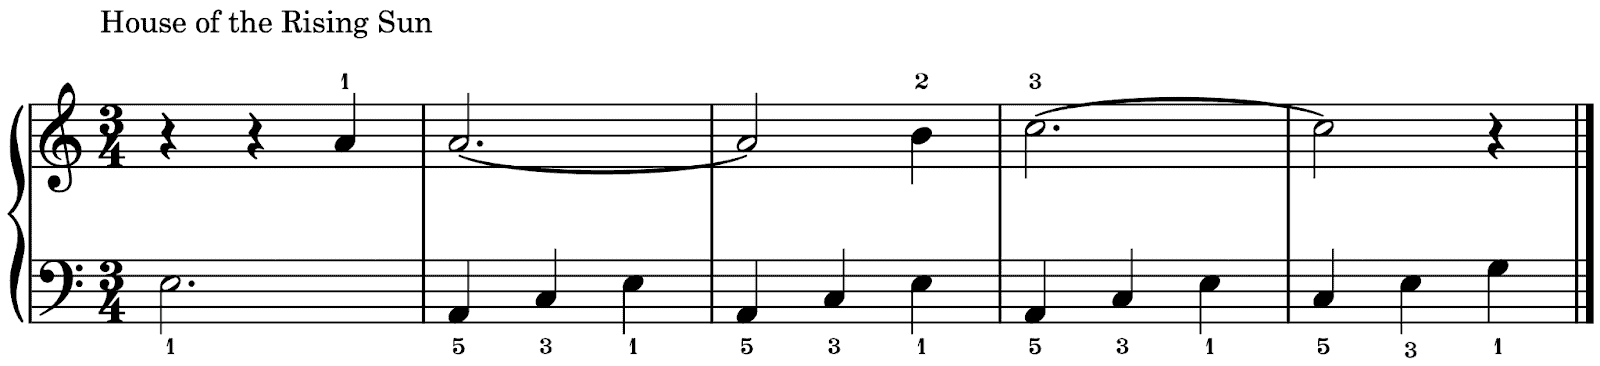
In this example, “House of the Rising Sun”, our left hand starts in a five finger position with our thumb on E in the bass clef . In the fourth bar however, we need to change position. We move our left thumb pinky finger to the new note, and play the broken chords arpeggio C. Our finger position has made this exercise very simple, and easy.
Song #3: Copacabana
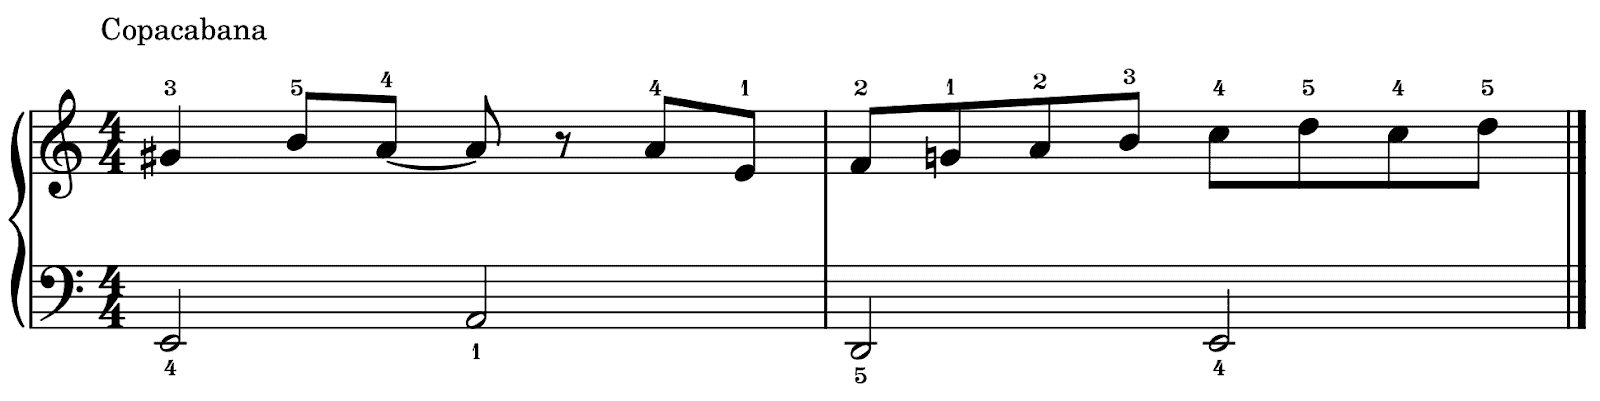
This example exercises the hardest part of learning to play piano: the thumb under technique. The right hand thumb sneaks under the index finger as the scale climbs. We cannot play the entire melody without moving out of the five finger position. The fingering is the same for most of our piano scales.
When should you do finger strengthening exercises for piano?
Piano warm-up exercises not only prepare you for daily practice but also set the foundation for mastering the best piano solos of all time. They help your body and mind be prepared to endure the physicality of your every-day piano playing. However, before we discuss any specific exercises, let’s take a look at a few exercising tips:
| PRO-TIP 1: Exercise before you practice | Playing piano with cold fingers can be risky business for various reasons. It is unfortunately all too-common to hear about people experiencing aches and pains from practicing piano the wrong way for years. |
| PRO-TIP 2: Take advantage of your free time with piano-less exercises. | A great advantage of warm-up exercises is that you can do most of them away from the piano. Yes — away from the piano means literally anywhere – on a plane, on a bus, while you’re driving to work, or laying on the couch. |
| PRO-TIP 3: Mix it up! Make your piano session more engaging by combining activities. | Although not all practice sessions are created equal, we all know the feeling: You sit at the piano, ready to give your best performance ever, but after 5 minutes or so you start feeling distracted and tired. |
Final words
In this article we looked at different exercises to improve your technique, as well as some best practices to approach them. These help you address different aspects and skills relevant to piano playing, such as hand posture and position, muscle memory, finger independence, coordination, and expressivity. Additionally, we shared a couple of complementary lessons available through the Skoove app.
Now that you’re well-equipped with new practicing techniques, it’s time to take your abilities to the next level. Enrich your piano routine with your new knowledge and we’ll see you in the next article. Happy playing!
Author of this blog post:

Eddie Bond is a multi-instrumentalist performer, composer, and music instructor currently based in Seattle, Washington USA. He has performed extensively in the US, Canada, Argentina, and China, released over 40 albums, and has over a decade experience working with music students of all ages and ability levels.